Cleaning
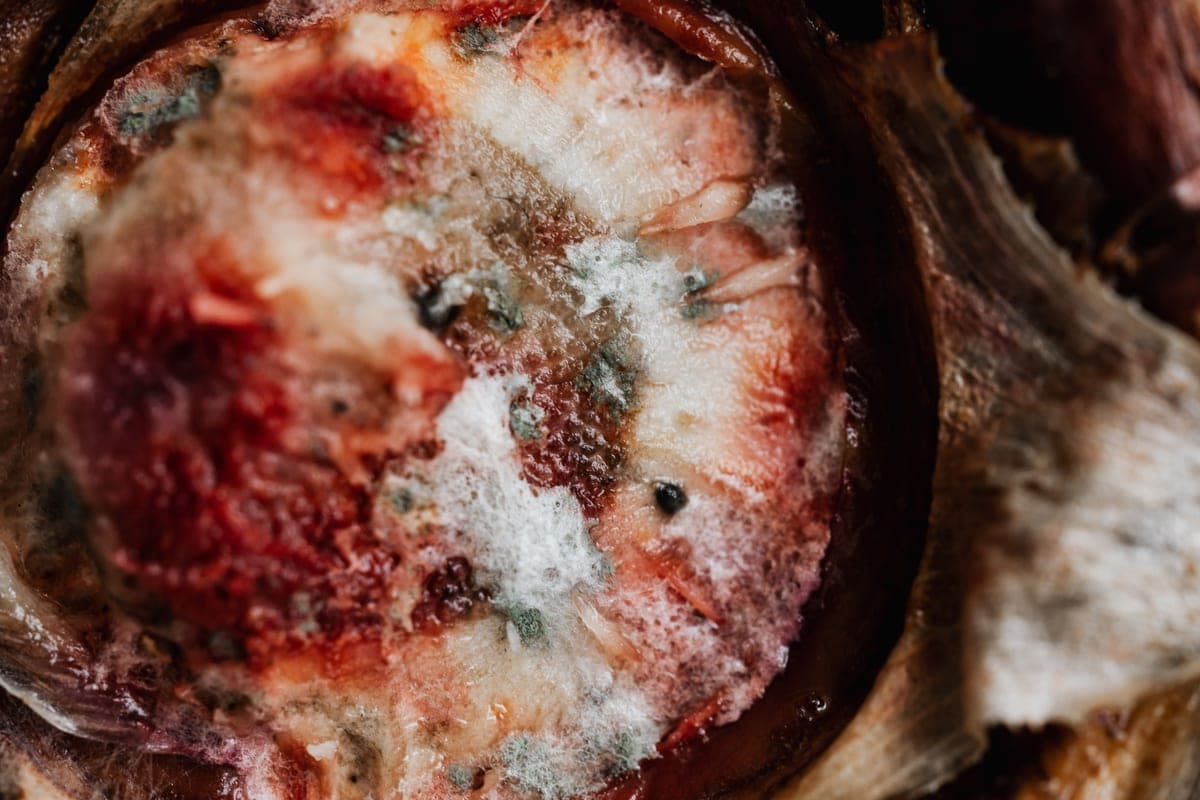
Mold in a hummingbird feeder
The black specks in the ports are the reason the cleaning schedule exists. Here is how to clear them, and how to stop them coming back.
We earn a commission on purchases made through our links, at no extra cost to you. We don’t accept free products or paid placements. Full disclosure.
Take the feeder completely apart, scrub every surface with a bottle brush and a port brush, then soak in a four-to-one vinegar and water solution — or a dilute bleach solution if the growth is established — rinse thoroughly and air dry completely before refilling. Then fix whatever caused it, because mold in a feeder is a symptom of the schedule, the location or the feeder itself.
What we recommend here
| # | Product | Best for | Score | Price |
|---|---|---|---|---|
| 1 | No product photo yet Hummingbird Feeder Brush Kit (3-piece) Mold lives inside the ports; only a port brush reaches there | What actually removes it | 8.7 out of 10 | |
| 2 |  Aspects HummZinger HighView 12 oz Two parts and no hidden surfaces | Hardest feeder to grow mold in | 9.3 out of 10 | |
| 3 |  Kingsyard 16 oz Glass Feeder Glass stays clear, so growth is visible early | Easiest to see it coming | 8.4 out of 10 | $19.99 on Amazon $22.99 13% off |
Scores are our own editorial ratings from the criteria on our methodology page. They are not customer ratings and they are not test results.
What you are looking at
Black or gray specks around the feeding ports, dark strands in the reservoir, or a slippery film on the inside of the base. It establishes at the ports first because that is the warmest, sugariest, least-rinsed part of the feeder — and it is also exactly where a bird puts its bill and tongue.
Cornell’s cleaning guidance names preventing mold and deadly fermentation as the purpose of the schedule. This is a welfare matter, not an appearance one.
Clearing it
- Take the feeder out of service. Empty it and do not put it back up until it is properly clean and dry.
- Disassemble everything. Lid, reservoir, base, ports, perches, moat. Mold hides in joints.
- Dry-brush the worst of it first if there is visible growth, so you are not just smearing it around when the water goes on.
- Scrub in hot water with the right brushes. Bottle brush for the reservoir, socket brush for the base, port brush inside every single port. The ports are not optional — they are the point.
- Soak. Four parts water to one part vinegar for ordinary growth, per Clemson’s guidance. For established growth a dilute bleach solution is an accepted option, with the standard hard condition: rinse off all residue thoroughly.
- Rinse until there is no smell of anything at all, then air dry completely before refilling — which Cornell specifically calls for.
If the ports themselves are pitted or stained after all that, replace them. They are cheap — see feeder parts.
Why it came back last time
Clearing mold once is easy. If it keeps returning, one of four things is true, and you will save yourself a summer by finding out which.
1. The change interval is too long
The most common cause by a wide margin. Three to five days in moderate weather, daily when it is very hot. If you are running a week, mold is not surprising, it is scheduled. The cadence page.
2. The feeder is in the sun
Direct afternoon sun promotes your feeder to the daily schedule. Morning sun and afternoon shade is the fix and it costs nothing. Placement.
3. You are topping up rather than changing
Adding fresh nectar to old nectar in an unwashed feeder feeds whatever is already growing. Every change is empty, wash, refill.
4. The feeder cannot actually be cleaned
The one nobody wants to hear. If your feeder does not separate — if the base is sealed, or the ports do not come out, or the reservoir neck is too narrow for a brush — then you are not cleaning it, you are rinsing it, and mold will keep coming back no matter how diligent you are.
This is why we score cleaning access on every product on this site and why our top pick is a plain two-part dish. Our methodology · feeders that genuinely open.
A note on the feeder you cannot see into
Polycarbonate develops a permanent UV haze after a couple of seasons. Once it does, you cannot tell mold from cloudiness by looking — which removes the informal check most people actually rely on. If your plastic feeder has gone milky, either commit to the calendar strictly or switch to glass, which stays clear.
Recommended for this
What we’d buy
1. What actually removes it
Hummingbird Feeder Brush Kit (3-piece)
A bottle brush, a socket brush and a thin port brush. The port brush is the one that matters — it is the only thing that reaches inside a flower port, and a flower port is where mold starts.
photo yet
- Bottle brush
- Typically 13.5" long, 1.5" bristle diameter
- Socket brush
- Typically 8" long, 1" bristle diameter
- Port brush
- Typically 8.25" long, sized for feeding ports
- Bristles
- Nylon — non-scratching on glass and plastic
Our score: 8.7/10 — an editorial rating, not a customer rating or a test result.
Cleaning access
Rinse the brushes when you rinse the feeder and stand them up to dry. A brush stored wet in a drawer grows its own problem.
What works
- The port brush reaches the one surface a sponge and a stream of water never will
- Nylon bristles will not scratch polycarbonate, which is what makes it cloud
- Cheap enough that there is no argument for not owning one
What doesn’t
- Kit contents vary by seller — check the port brush is actually included
- A 13.5" bottle brush will not reach the bottom of a tall 32 oz reservoir
- Bristles wear out; a splayed brush stops reaching into ports
Specifications from Duncraft — Nectar Brush Set and Blue Bird Landing — Hummingbird Feeder Cleaning Brush 3-Piece Kit. We have not handled this feeder — here is what we did instead.
2. Hardest feeder to grow mold in
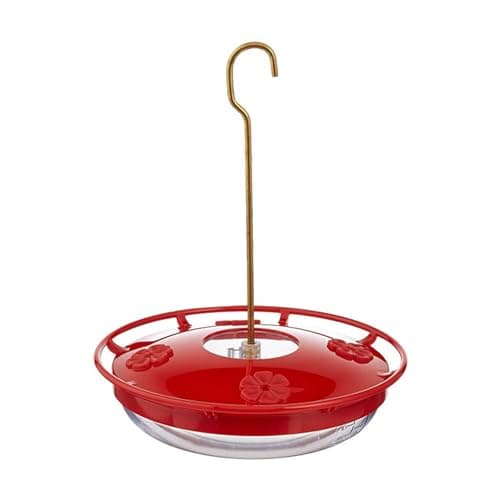
Aspects HummZinger HighView 12 oz
A four-port saucer feeder with the ant moat built into the lid and a cover that lifts straight off — the shortest path from hanging it up to washing it out.
- Type
- Saucer (dish)
- Capacity
- 12 oz
- Feeding ports
- 4
- Material
- Polycarbonate, metal hanger
- Dimensions
- 7.75" x 7.75" x 1.75"
- Ant moat
- Built in
- Perch
- Raised wraparound perch
- Mounting
- Hang or post mount
Our score: 9.3/10 — an editorial rating, not a customer rating or a test result.
Cleaning access
Two parts. The cover lifts off the base with no tools and no threads to cross, and the whole dish is one open bowl — a two-minute wash with a brush and hot water, which is exactly the cadence a nectar feeder needs. The moat is part of the lid, so there is no separate accessory to lose or forget to refill.
What works
- Saucer design puts nectar below the ports, so it does not drip as the air inside warms
- Ant moat is integral to the lid rather than a separate hanging accessory
- Opens to a single shallow bowl — the easiest shape in the category to scrub
- Raised ports shed rain, which keeps the nectar from being diluted
What doesn’t
- 12 oz is small for a busy yard
- Polycarbonate clouds over several seasons in a way glass does not
- No bee-excluding port tips fitted — that is the Ultra's feature, not the HighView's
Specifications from Duncraft — Aspects High View HummZinger and Amazon — Aspects HummZinger HighView 12 oz. We have not handled this feeder — here is what we did instead.
3. Easiest to see it coming
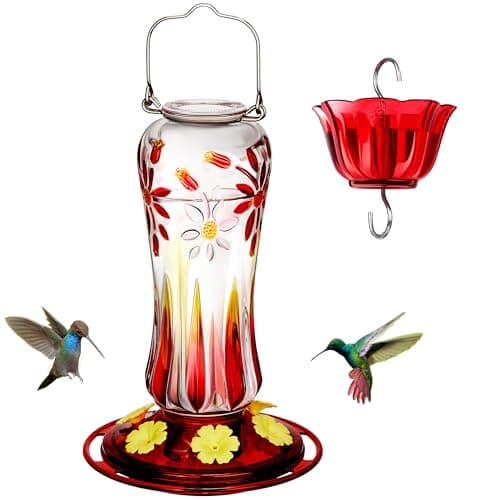
Kingsyard 16 oz Glass Feeder
Six flower ports sized to admit a hummingbird bill and not much else, a thick glass reservoir, and an ant moat in the box — the glass feeder that does not make you buy accessories to finish it.
- Type
- Glass bottle
- Capacity
- 16 oz
- Feeding ports
- 6, flower-shaped
- Material
- Glass reservoir, plastic base
- Ant moat
- Included
- Bee guards
- Ports sized to exclude bees
Our score: 8.4/10 — an editorial rating, not a customer rating or a test result.
Cleaning access
Fully disassembles — reservoir, base and ports all come apart, which is what you want, because a six-port base has six places for residue to sit. The glass reservoir is the easy part; plan on a port brush for the flowers.
What works
- Six ports and a supplied ant moat at a mid-range price
- Glass stays visually clean, so the nectar level and its condition are readable at a glance
- Disassembles completely rather than to two pieces
What doesn’t
- More parts to wash than a saucer, every single time
- Glass and a full 16 oz make for a heavy hang
- Port sizing discourages bees but is not the same as a fitted Nectar-Guard tip
Specifications from Kingsyard — hummingbird feeder range and Amazon — Kingsyard Glass Hummingbird Feeders for Outdoors. We have not handled this feeder — here is what we did instead.
Common questions
Frequently asked
How do you clean a hummingbird feeder with mold?
Take it fully apart, scrub every surface with a bottle brush and a port brush in hot water, soak in a four-to-one vinegar and water solution — or dilute bleach for established growth — rinse thoroughly, and air dry completely before refilling.
Is mold in a hummingbird feeder dangerous to birds?
It is the reason the cleaning schedule exists. Cornell describes changing sugar water as preventing mold and deadly fermentation, and mold establishes in the ports — precisely where a bird’s bill and tongue go.
Why does my hummingbird feeder keep getting moldy?
Usually one of four things: the change interval is too long, the feeder is in direct sun, you are topping up rather than emptying, or the feeder does not come apart far enough to actually be cleaned.
Can I use bleach on a hummingbird feeder?
A dilute bleach solution is an accepted option for established growth, with one hard condition: rinse off every trace of residue and let the feeder air dry completely before refilling.
Sources
Where this came from
Read next
Related reading
By Scooter M.
an enthusiast who's genuinely into this. I read the manuals, compile the published specs, and do the math. No lab coat.
Published September 1, 2026